Chinese Pineapple Buns recipe is one of my favorite baked goods to try turning basic ingredients into a crispy, sweet treat. These buns have a sugary top crust that resembles a pineapple. The contrast of the fluffy bread and crumbly topping is what gives them their charm.
In my experience, the key to making the right Chinese Pineapple Buns recipe is getting the topping just right and the bread soft and airy enough to be palatable any time of day.
The recipe for Chinese Pineapple Buns allows for experimentation and customization. Whether fresh from the oven or stored for a later treat, the buns are still a favorite. The process might be complex in the beginning, but each step becomes satisfying and rewarding with practice.
Overview of Chinese Pineapple Buns Recipe
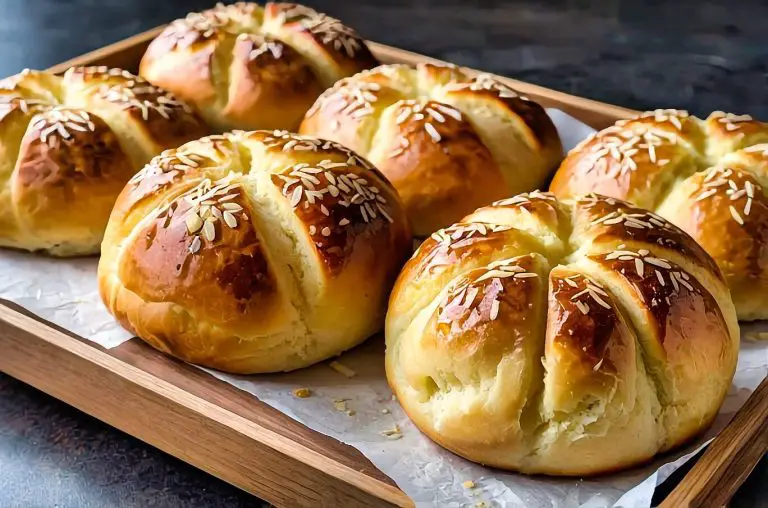
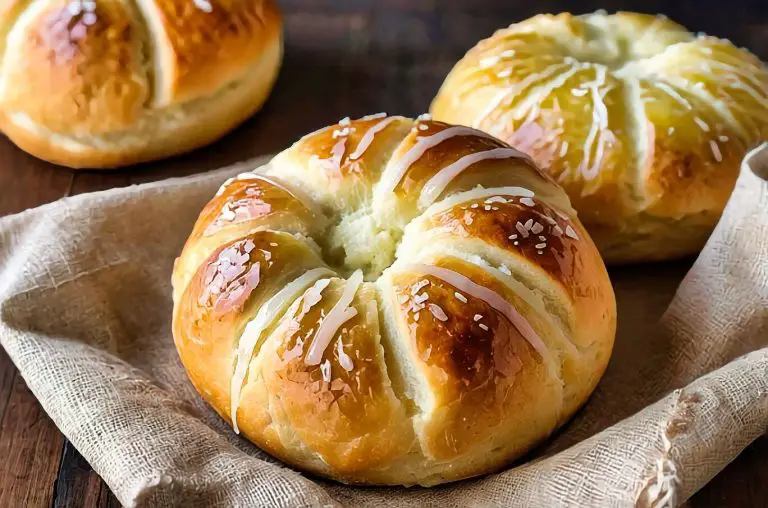
The recipe for Chinese Pineapple Buns has a misleading name. They may be “pineapple buns,” but they contain no pineapple. Instead, they get their name from the golden-brown, textured crust that covers it, reminiscent of a pineapple surface.
Important to the recipe for Chinese Pineapple Buns is the right texture combo. The buns have a soft, fluffy interior with a crisp crust. This contrast explains their popularity and pampering taste.
The Chinese Pineapple Buns recipe will often have a few key steps to get the consistency and flavor you want. The dough is usually sweet and made with butter or milk. It may rise until light and airy.
Then the topping is made separately in the Chinese Pineapple Buns recipe. This layer contains sugar, flour and butter. Carefully applied, it expands in baking to give that “pineapple” look.
When baking, the smells in the kitchen may be irresistible. The recipe for Chinese Pineapple Buns smells inviting. When prepared, serve the buns immediately from the oven or even the same day for the most effective texture.
Another name for these buns is bo lo bao. Whatever they are called, the recipe for Chinese Pineapple Buns is a must have for any baker’s arsenal. They are excellent for breakfast, snack foods or a treat with coffee or tea.
Components of Pineapple Buns
Three main elements define Chinese Pineapple Buns structure and flavor. They include the crunchy topping, the soft bread base and the different fillings.
The Unique Topping
Cookie topping/strong >is a signature of Chinese Pineapple Buns, though it lacks a real Pineapple: it’s actually made from melted butter and sugar, and is rolled out over The dough before baking, to give it a golden color and crisp texture.
The Bread Dough Base.
The base of the bun is a soft milk bread , made by tangzhong, which cooks some of the flour with water, making the bread more moist.
Filling Variations
While traditional Chinese Pineapple Buns lack filling, variations include Red bean paste and strong custard filling.
Some versions also explore unique blends like coconut buns, where shredded coconut adds texture and flavor. The choice of filling can significantly alter the eating experience, providing versatility to this classic treat.
Baking Process & Techniques
The art of baking Chinese Pineapple Buns is in the preparation of dough, shaping and proofing, and the steps in the bake. They are crucial to get the desired look, flavor, and texture.
Making the Dough
When I make the dough for Chinese Pineapple Buns, I gather the basic ingredients. The procedure will involve starting with flour, sugar, salt along with a little baking powder. These ingredients create the structure of the dough. I mix all in a big bowl prior to adding the wet ingredients.
I then pour in the milk and use active dry yeast to make the fermentation that the dough needs. A yolk is added next. The kneading step is important and calls for a firm hand to make the dough flexible. I know that patience here gets more consistent results. The dough is left to rise in a warm spot once kneaded.
Shaping and Proofing
As soon as dough rises, I deflate it and split it into portions. Rolling each portion into a ball forms these buns. Here is exactly where attention to detail pays off. I form each piece with my hands. This uniformity enables later baking.
Proofing occurs after shaping. I place the formed balls on a parchment lined baking sheet to rest. This stage makes the buns extra fluffy. I usually cover them loosely and place them in a warm place to proof in. The yeast returns and the dough rises a second time.
The Final Bake
I have to concentrate on the baking to make these Chinese Pineapple Buns. I set the oven to the correct temperature prior to putting them in there. The buns ought to be baked on the baking sheet in a preheated oven to ensure even cooking. I watch the time carefully, not opening the oven too early could disturb the bun development.
The outside of the buns gets golden brown as the final bake gives them a crisp texture. I take them out when they are just right and let them cool slightly before enjoying the warm, soft insides. By watching each step carefully, I make the perfect Chinese Pineapple Buns recipe.
Technical Considerations Tips
The preparation of Chinese Pineapple Buns requires understanding the details of ingredient selection, texture optimization and tool adaptation. Each component is crucial to a delicious result.
Optimising Ingredients for Quality.
For The most flavorful Chinese Pineapple buns, use only cake flour and combine with lukewarm milk for moistness and flavor.
Ensure Perfect Texture
Coming up with the perfect texture in Chinese Pineapple buns requires careful attention to detail during baking – the creamy foam that forms on the surface may indicate that the Buns are almost done when the internal structure is set.
Adapting to Kitchen Tools
Choosing the right kitchen tools can affect the outcome of your Chinese Pineapple Buns. I use a microwave for a quick initial rise when the ambient temperature isn’t warm enough.
A well-greased baking sheet is necessary for even cooking and easy removal after baking.
Ingredients For the Chinese Pineapple Buns Recipe
Dough
All-purpose Flour
Water
Safflower Oil
Whole Milk
Granulated Sugar
Dry Yeast
Bread Flour
Kosher Salt
Sweetened Condensed Milk
Egg
Butter
Topping
Butter
Sugar
Vanilla Extract
Egg Yolk
Whole Milk
All-purpose Flour
Baking Powder
Turmeric
Egg Wash
Egg
Whole Milk

Cooking Instructions For the Chinese Pineapple Buns Recipe
Tangzhong
Whisk the flour and water inside a saucepan until the flour dissolves. Place the saucepan over medium heat and stir the mixture frequently. In about a minute, the flour will start to thicken. Don’t walk away during this process as you can quickly burn the tangzhong! Once the flour develops into a light paste, turn off the heat.
Transfer the tangzhong to a bowl to cool. It will thicken as it cools.
Dough for Buns
Grease a large mixing bowl with oil. Set it aside.
In a microwave-safe bowl, heat the milk for about 40 to 45 seconds. Add the sugar to the milk. Use a thermometer to check the temperature of the milk. It should be around 110ºF to 120ºF. It’s okay if you are just several degrees off. Add the yeast and stir to hydrate the yeast. Let it sit for 5 to 8 minutes while you prepare the other ingredients. After 5 to 8 minutes, the milk/yeast mixture will foam up.
In the bowl of a stand mixer, combine the bread flour, salt, condensed milk, egg, melted butter, tangzhong and the foamy milk/yeast mixture.
Fit the mixer with the dough hook. Mix the dough on low for 8 minutes (see note 6). If the dough completely spins away from the dough hook after a few minutes, turn off the mixer. Readjust the dough right into the center of the bowl and position the dough hook in the center of the dough. Run the mixer on “stir” for 15 seconds or so before you increase the speed to low.
After 10 minutes, scrape the dough out of the bowl onto a surface and knead it several times. The dough shouldn’t be sticky, so you do not need to flour the surface.
Shape the dough into a ball and place inside the greased mixing bowl. Cover the bowl with plastic or silicone mat. Let the dough rise in a warm area for about 1 hour to 1 hour 30 minutes, until the dough doubles in size.
Prepare the Dough for Topping
Add the butter to the bowl of a stand mixer. Fit the mixer with the flat beater attachment. Cream the butter on medium-low until it is light and fluffy, about 1 to 2 minutes. Add the superfine sugar in two batches. The mixture will look very crumbly at this point, and that’s okay.
Next, add the egg yolk, milk, and vanilla, and mix on low until just combined.
In a small bowl, mix the flour, baking powder, and turmeric. Add half of the flour to the bowl with the wet ingredients, and mix on low until the flour is combined. Then, add the remaining flour and mix again. Once all the loose flour has been incorporated, increase the speed to medium-low, and keep mixing until the dough starts to come together into large chunks.
Scrape the dough out of the bowl onto a surface. Gather it up into one large ball of dough. Transfer this to another bowl and cover it with a towel or silicone mat until the buns are done proofing.
Shape the Buns
Line 2 large baking sheets with parchment paper. Once doubled, punch down the dough to release excess air. Turn the dough onto a work surface. Divide the dough into 2 equal portions (450 to 456 grams each). Place 1 portion of dough back into the bowl, cover it, and refrigerate while you shape the first batch of buns.
Next, divide the remaining dough into 6 equal pieces (74 to 76 grams each). Take one of the pieces of dough and knead it several times to get rid of any air bubbles. Then, shape this dough into a ball and transfer it to the lined baking sheet, seam side down. The dough should be about 2 inches in diameter. Repeat with the remaining 5 pieces of dough.
Cover the balls of dough with a towel and let them rise in a warm place for 30 to 45 minutes, until they increase to 1.5 times its size (about 3 inches in diameter). Preheat the oven to 375ºF. If you want more golden looking pineapple buns, preheat the oven to 385ºF. Position an oven rack to the center position.
While the buns are proofing, divide the dough for the topping into 12 pieces (about 27 to 29 grams each). Roll each piece into a ball. Take a plastic storage bag, and cut off the zipper. Continue cutting the bag along the edges so that you have 2 large sheets of plastic. You’ll be rolling the topping in between these plastic sheets.
In a small bowl, prepare the egg wash by whisking an egg yolk with 1 tablespoon of milk. After the buns are done proofing, start rolling out the topping. Take a ball of the topping dough and place it on the center of a plastic sheet. Lightly flatten the dough out with the palm of your hand. Then, cover the flattened disc with the other sheet of plastic. Roll out the dough until you get a circle that is 3.5 to 3.75 inches wide.
Peel off the top sheet of plastic, turn the topping onto your hand and carefully peel off the other sheet of plastic.
Drape the topping over one of the buns. The topping shouldn’t cover the bun completely. The topping can burn if it touches the bottom of the baking sheet. Continue rolling out the topping and draping it over the buns.
Brush the tops of the buns with egg wash.
Bake the buns for 14 to 16 minutes, until the tops are lightly golden. Once the first batch of buns is in the oven, prepare the second batch of buns and bake. Let the buns cool on the baking sheet for several minutes before transferring them to a cooling rack. Enjoy the buns while they’re still warm! That’s when they are the tastiest.

FAQ For the Chinese Pineapple Buns Recipe
Question: What is the Chinese Pineapple Buns recipe?
A: The Chinese Pineapple Buns recipe is a popular Hong Kong-style pastry that consists of a sweet, crumbly topping resembling a pineapple skin, though it does not actually contain pineapple. The soft, fluffy bun beneath the topping is slightly sweet and buttery.
Question: How do you make the Chinese Pineapple Buns recipe?
A: To make the Chinese Pineapple Buns recipe, you first prepare a dough for the bun, which is allowed to rise. Then, a sweet, crumbly topping made of butter, sugar, and flour is placed on top before baking. The result is a soft bun with a crunchy, sweet top.
Question: Can I add fillings to the Chinese Pineapple Buns recipe?
A: Yes, you can add fillings to the Chinese Pineapple Buns recipe, such as custard, red bean paste, or even a savory filling like pork or chicken. Just be sure to adjust the baking time slightly if adding a filling.
Question: How do you store the Chinese Pineapple Buns recipe?
A: The Chinese Pineapple Buns recipe should be stored in an airtight container to keep them fresh. They can be kept at room temperature for a few days, or refrigerated for longer shelf life. Reheat them for a few seconds in the microwave to restore their soft texture.
Question: Can I make the Chinese Pineapple Buns recipe ahead of time?
A: Yes, you can make the Chinese Pineapple Buns recipe ahead of time. They can be baked and stored, or you can freeze the dough and toppings separately and bake them when needed. Ensure they are fully cooled before storing or freezing.

Easy Chinese Pineapple Buns Recipe
Ingredients
- 2 tbsp All-purpose Flour
- 1/3 cup Water
- 1 tsp Safflower Oil
- 1/2 cup whole milk + 2 tablespoons
- 1 1/2 tbsp Granulated Sugar
- 2 1/4 tsp Yeast active Dry
- 16 oz Flour
- 1 tsp Kosher Salt
- 4 tbsp Sweetened Condensed Milk
- 1 large Egg
- 4 tbsp Butter
- 4 tbsp Butter at room temperature
- 2/3 cup Sugar superfine
- 1 tsp Vanilla Extract
- 1 Egg Yolk
- 1 tbsp Whole Milk
- 6 oz All-purpose Flour
- 1/4 tsp Baking Powder
- 1/8 tsp Turmeric
- 1 large Egg
- 1 tbsp Whole Milk
Instructions
- Whisk the flour and water inside a saucepan until the flour dissolves. Place the saucepan over medium heat and stir the mixture frequently. In about a minute, the flour will start to thicken. Don’t walk away during this process as you can quickly burn the tangzhong! Once the flour develops into a light paste, turn off the heat.
- Transfer the tangzhong to a bowl to cool. It will thicken as it cools.
- Grease a large mixing bowl with oil. Set it aside.
- In a microwave-safe bowl, heat the milk for about 40 to 45 seconds. Add the sugar to the milk. Use a thermometer to check the temperature of the milk. It should be around 110ºF to 120ºF. It’s okay if you are just several degrees off. Add the yeast and stir to hydrate the yeast. Let it sit for 5 to 8 minutes while you prepare the other ingredients. After 5 to 8 minutes, the milk/yeast mixture will foam up.
- In the bowl of a stand mixer, combine the bread flour, salt, condensed milk, egg, melted butter, tangzhong and the foamy milk/yeast mixture.
- Fit the mixer with the dough hook. Mix the dough on low for 8 minutes (see note 6). If the dough completely spins away from the dough hook after a few minutes, turn off the mixer. Readjust the dough right into the center of the bowl and position the dough hook in the center of the dough. Run the mixer on “stir” for 15 seconds or so before you increase the speed to low.
- After 10 minutes, scrape the dough out of the bowl onto a surface and knead it several times. The dough shouldn’t be sticky, so you do not need to flour the surface.
- Shape the dough into a ball and place inside the greased mixing bowl. Cover the bowl with plastic or silicone mat. Let the dough rise in a warm area for about 1 hour to 1 hour 30 minutes, until the dough doubles in size.
- Add the butter to the bowl of a stand mixer. Fit the mixer with the flat beater attachment. Cream the butter on medium-low until it is light and fluffy, about 1 to 2 minutes. Add the superfine sugar in two batches. The mixture will look very crumbly at this point, and that’s okay.
- Next, add the egg yolk, milk, and vanilla, and mix on low until just combined.
- In a small bowl, mix the flour, baking powder, and turmeric. Add half of the flour to the bowl with the wet ingredients, and mix on low until the flour is combined. Then, add the remaining flour and mix again. Once all the loose flour has been incorporated, increase the speed to medium-low, and keep mixing until the dough starts to come together into large chunks.
- Scrape the dough out of the bowl onto a surface. Gather it up into one large ball of dough. Transfer this to another bowl and cover it with a towel or silicone mat until the buns are done proofing.
- Line 2 large baking sheets with parchment paper. Once doubled, punch down the dough to release excess air. Turn the dough onto a work surface. Divide the dough into 2 equal portions (450 to 456 grams each). Place 1 portion of dough back into the bowl, cover it, and refrigerate while you shape the first batch of buns.
- Next, divide the remaining dough into 6 equal pieces (74 to 76 grams each). Take one of the pieces of dough and knead it several times to get rid of any air bubbles. Then, shape this dough into a ball and transfer it to the lined baking sheet, seam side down. The dough should be about 2 inches in diameter. Repeat with the remaining 5 pieces of dough.
- Cover the balls of dough with a towel and let them rise in a warm place for 30 to 45 minutes, until they increase to 1.5 times its size (about 3 inches in diameter). Preheat the oven to 375ºF. If you want more golden looking pineapple buns, preheat the oven to 385ºF. Position an oven rack to the center position.
- While the buns are proofing, divide the dough for the topping into 12 pieces (about 27 to 29 grams each). Roll each piece into a ball. Take a plastic storage bag, and cut off the zipper. Continue cutting the bag along the edges so that you have 2 large sheets of plastic. You’ll be rolling the topping in between these plastic sheets.
- In a small bowl, prepare the egg wash by whisking an egg yolk with 1 tablespoon of milk. After the buns are done proofing, start rolling out the topping. Take a ball of the topping dough and place it on the center of a plastic sheet. Lightly flatten the dough out with the palm of your hand. Then, cover the flattened disc with the other sheet of plastic. Roll out the dough until you get a circle that is 3.5 to 3.75 inches wide.
- Peel off the top sheet of plastic, turn the topping onto your hand and carefully peel off the other sheet of plastic.
- Drape the topping over one of the buns. The topping shouldn’t cover the bun completely. The topping can burn if it touches the bottom of the baking sheet. Continue rolling out the topping and draping it over the buns.
- Bake the buns for 14 to 16 minutes, until the tops are lightly golden. Once the first batch of buns is in the oven, prepare the second batch of buns and bake. Let the buns cool on the baking sheet for several minutes before transferring them to a cooling rack. Enjoy the buns while they’re still warm! That’s when they are the tastiest.

“`
3 comments
These were really nice dessert rolls. Taste of pineapple made them sharp and tangy.
I dont get the hype over pineapple buns. Why not just have a regular bun with real pineapple filling? Seems like a lot of effort for a so-so dessert. Just my two cents 🤷♂️
I personally think the key to a great pineapple bun lies in the balance between the sweet topping and the fluffy bread base. Its like a delicate dance of flavors that shouldnt be underestimated!