
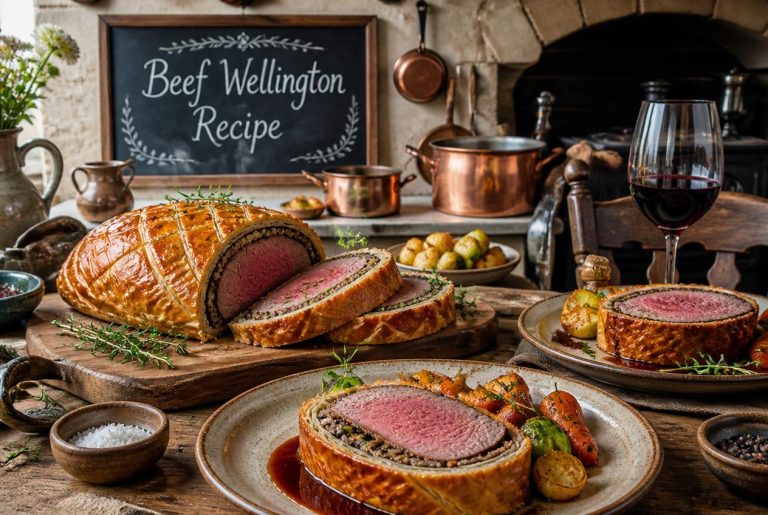
For ages, I thought Beef Wellington was impossibly fancy and a pain to make, but honestly, I was just overthinking it. Beef Wellington is a show-stopping dish of beef tenderloin wrapped with mushroom duxelles and often prosciutto, then enclosed in golden puff pastry. The result? A juicy, tender center surrounded by crispy, buttery layers—suddenly, any dinner feels like an event.
What really gets me about this classic dish is how doable it is. Once you get the hang of searing the beef, spreading the mushroom mixture, and wrapping it all up in pastry, you’re well on your way to nailing a Beef Wellington recipe that looks and tastes like it came from a restaurant. I’ll walk you through what I’ve learned: prep tricks, storage hacks, and a few things I wish someone had told me sooner.
Whether you’re pulling together a holiday meal or just want to blow your family away on a random Sunday, the Beef Wellington recipe delivers on both flavor and presentation. The combo of mustard, mushrooms, and tender beef creates these rich, layered flavors that—I swear—always have people reaching for seconds.
Beef Wellington Recipe
Key Takeaways
- Beef Wellington wraps seasoned beef tenderloin in mushroom duxelles and puff pastry for an elegant main dish
- The recipe needs careful layering and wrapping, but it’s much less intimidating once you break it down
- You can riff on the Beef Wellington recipe with different meats or individual portions, and leftovers keep for up to three days
English Recipe Description and Historical Information
I find Beef Wellington absolutely thrilling! It’s a beef fillet coated in chopped mushrooms and liver pâté, then baked inside a puff pastry shell.
The traditional recipe I love features beef tenderloin and duxelles wrapped in pastry. Many versions add prosciutto or dry-cured ham, which keeps the meat juicy and stops the pastry from turning soggy. It’s a clever move in any Beef Wellington recipe.
Key Components:
- Beef tenderloin (center cut)
- Duxelles (finely chopped mushrooms with herbs and spices)
- Puff pastry
- Prosciutto or pâté
- Mustard coating
Where did the Beef Wellington recipe actually come from? I wish I knew! Although widely regarded as British food, its origins are actually unknown. Both France and Britain have pretty deep roots with meat-in-pastry dishes.
There’s a fun story that a cook created it for the Duke of Wellington, Arthur Wellesley. I don’t really buy it, but it’s a good tale. Honestly, the idea of meat wrapped in pastry goes way back—think ancient Greece and Rome.
This culinary masterpiece has been a staple of fine dining for centuries. The Beef Wellington recipe takes simple ingredients and turns them into something spectacular. Every layer adds flavor and texture—I can’t help but crave it just writing about it.
Recipe Tips
I always bring my beef tenderloin to room temperature before searing. It cooks more evenly that way and doesn’t end up with a cold center.
The mushroom duxelles needs to be bone dry before wrapping. I cook mushrooms until all the moisture is gone—otherwise, the pastry gets soggy, and that’s just not what you want in a Beef Wellington recipe.
Key steps I never skip:
- Sear the beef on all sides to get a deep brown crust
- Let the meat cool completely before wrapping
- Chill the wrapped Wellington for at least 30 minutes before baking
- Brush the pastry with egg wash for that golden finish
I like to score the pastry for a nice pattern and even baking. Just don’t go too deep—light diagonal lines look great and do the trick.
An instant-read thermometer saves me every time. I pull my Beef Wellington recipe from the oven when it hits 120°F for medium-rare. The temp creeps up another 5-10 degrees as it rests.
Resting time is huge. I wait at least 10 minutes before slicing. This lets the juices settle and keeps things tidy when I cut into it.
For slicing, I grab a sharp serrated knife. A dull one just squashes the pastry and makes a mess. You want those layers of golden puff pastry, mushrooms, and tender beef to shine in every slice.
Variations
I love how a Beef Wellington recipe can be tweaked a million ways! Sure, the classic uses beef tenderloin, mushroom duxelles, and puff pastry, but there’s so much room to play.
One of my favorite spins is making individual portions instead of a giant Wellington. Individual Beef Wellington servings use filet mignon steaks, which makes dinner parties way less stressful. Plus, everyone gets their own little showstopper.
Protein Swaps
Beef isn’t the only option for a Beef Wellington recipe:
- Venison brings a bold, gamey twist
- Lamb is super tender and works beautifully
- Salmon gives you a fancy seafood version
- Vegan versions use mushrooms or plant-based proteins
Wrapper Options
The outer layers can change things up, too. Some Beef Wellington recipes wrap the meat in prosciutto or dry-cured ham before the pastry. It keeps things moist and the pastry crisp.
The duxelles filling is fair game as well. I like to mix up the mushrooms—sometimes I’ll toss in shiitake, cremini, or add fresh herbs like thyme or rosemary for extra punch.
Bite-Sized Fun
Beef Wellington bites are the best for parties! All the flavor of a full Beef Wellington recipe in a snackable size. They’re easier to make and much quicker to cook.
Even the coating gets creative. Dijon mustard is classic, but I’ve tried whole grain mustard and even horseradish cream for a little extra zing. Sometimes, you just gotta experiment.
Storage
I like making Beef Wellington ahead because it holds up so well! Raw Beef Wellington keeps for 3 to 5 days in the fridge, and cooked Wellington lasts 3 to 4 days.
When I store assembled, uncooked Beef Wellington, I wrap it tightly in plastic wrap or foil and stash it in the coldest part of the fridge. Don’t stack anything heavy on top—no one wants crushed pastry. The trick is keeping the pastry crisp and ready for baking, which is key for any Beef Wellington recipe.
For leftovers, I wrap slices individually. It makes reheating a breeze, plus you only grab what you need. No fussing with the whole thing.
Freezing is a lifesaver when you want to prep way in advance. I wrap uncooked Beef Wellington in plastic wrap, then foil, and freeze it for up to a month. It thaws overnight in the fridge and bakes up just as good as fresh.
- Store assembled Beef Wellington in the coldest fridge spot
- Wrap tightly to keep the pastry from turning soggy
- Keep cooked and uncooked portions separate
- Label everything with the date (trust me, you’ll forget otherwise)
I never leave Beef Wellington out for more than two hours. The beef tenderloin wrapped in pâté and mushrooms needs to stay cold for safety. When I stick to these storage tips, my Beef Wellington recipe always tastes just as incredible the next day.
Beef Wellington Recipe Cooking Tips
Beef Wellington Recipe Cooking Tips
• Beef Wellington is known for its tender beef fillet, savory mushroom layer, and flaky golden pastry.
• Beef tenderloin (fillet) is the traditional cut because of its tenderness and even shape.
• Sear the beef thoroughly before assembly to develop flavor and color.
• Allow the beef to cool completely after searing to prevent the pastry from becoming soggy.
• Mushroom duxelles should be cooked until most of the moisture evaporates.
• Prosciutto or similar cured ham is often used to help protect the pastry from moisture.
• Dijon mustard adds classic flavor and complements the richness of the beef.
• Puff pastry should remain cold while assembling for the flakiest texture.
• Wrap the Wellington tightly to help maintain an even shape during baking.
• Chilling before baking helps the pastry hold its form.
• Egg wash creates the traditional glossy golden crust.
• Use a meat thermometer to avoid overcooking the beef.
• Rest the Wellington after baking to allow juices to redistribute.
• Slice with a sharp serrated knife to preserve the pastry layers.
• The flavor should balance tender beef, earthy mushrooms, buttery pastry, and savory seasonings.
• Beef Wellington is often served for holidays, celebrations, and special occasions.
Beef Wellington Recipe Storage TIps
Beef Wellington Storage Tips
• Allow the Wellington to cool before transferring it into storage containers.
• Store refrigerated in airtight containers to preserve freshness.
• Refrigeration may soften the pastry slightly, which is normal.
• Reheat in the oven rather than the microwave to help restore pastry crispness.
• Avoid excessive reheating because the beef may overcook.
• Store sliced portions separately if easier for serving later.
• Mushroom and beef flavors often deepen after overnight refrigeration.
• Freezing fully baked Wellington is possible in airtight freezer-safe wrapping.
• Defrost frozen Wellington gradually in the refrigerator before reheating.
• Unbaked assembled Wellington can also be frozen before baking.
• Use clean utensils when handling leftovers to help maintain freshness.
• Beef-and-pastry dishes are generally best enjoyed within a shorter refrigerated storage period for ideal quality and texture.
• Keep away from strongly scented foods because pastry readily absorbs odors.
• Slight softening of the crust during storage is normal.
• Discard leftovers if the beef, mushrooms, or pastry develop sour odors, slime, mold, or unusual discoloration.
Beef Wellington Recipe
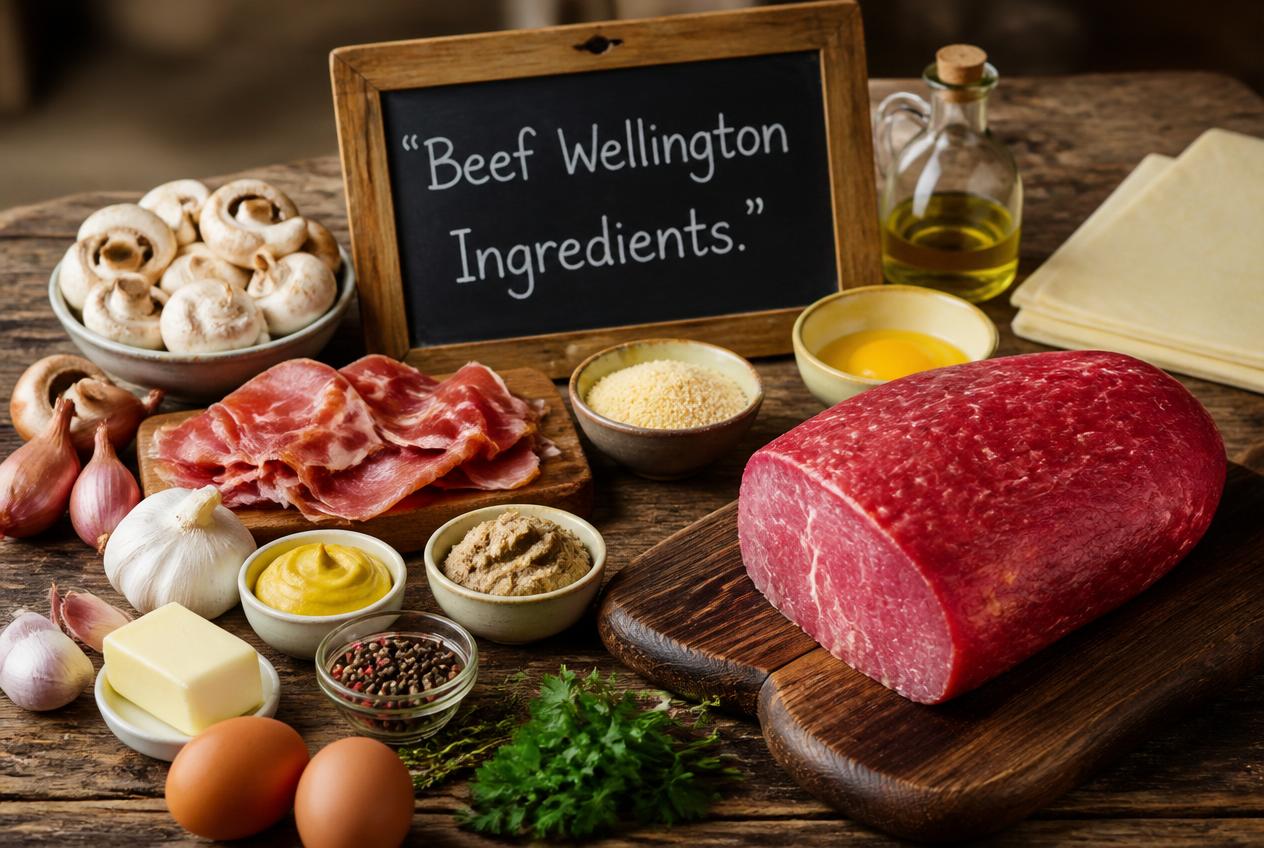
Ingredients
- 1 about 16-ounce package frozen puff pastry, preferably all-butter, thawed in the refrigerator according to package directions
- 2 medium shallots coarsely chopped
- 2 cloves garlic coarsely chopped
- 2 teaspoons fresh thyme leaves from 1/4 bunch
- 1 pound cremini mushrooms trimmed and halved (or quartered if large)
- 1 about 2 1/2-pound center-cut beef tenderloin roast
- 2 1/4 teaspoons kosher salt divided
- 1/2 teaspoon freshly ground black pepper
- 2 tablespoons vegetable oil
- 2 tablespoons unsalted butter
- 6 to 8 cold slices prosciutto about 5 ounces
- 1 large egg
- All-purpose flour for dusting
Instructions
- Place the shallots, garlic cloves, fresh thyme leaves, and half of the cremini mushrooms into the bowl of a food processor fitted with the blade attachment. Pulse the mixture in short bursts, stopping occasionally to scrape down the sides of the bowl, until everything is very finely chopped. Transfer the mixture to a medium bowl. Add the remaining mushrooms to the food processor and pulse until finely chopped as well, then add them to the bowl. The finished mixture should resemble a coarse paste with very small, evenly sized pieces. If you do not have a food processor, all of the ingredients can be finely chopped by hand, although it will take a bit longer.
- Prepare and Season the Beef Tenderloin
- Trim the beef tenderloin of any visible surface fat and silver skin. If one end of the roast is significantly thinner than the other, tuck it underneath to create a more uniform shape. Using kitchen twine, tie the roast crosswise at approximately 1½-inch intervals, then tie a length of twine down the length of the roast to help maintain an even thickness during cooking.
- Pat the roast completely dry with paper towels. A dry surface helps develop a better sear. Season the entire roast generously with the kosher salt and black pepper, making sure all sides are evenly coated.
- Heat the vegetable oil in a large frying pan over medium-high heat until shimmering. Carefully place the tenderloin into the hot pan and sear it on all sides, turning occasionally, until a deep golden-brown crust forms around the entire roast. This should take about 8 minutes total. The goal is not to cook the beef through, but rather to develop flavor and color on the exterior. Once seared, transfer the roast to a plate and refrigerate until cool enough to handle.
- Discard any excess fat remaining in the pan and return it to medium heat. Add the butter and allow it to melt completely. Stir in the mushroom mixture along with the remaining kosher salt. Cook the mushrooms slowly, stirring occasionally, until all of the moisture has evaporated and the mixture becomes concentrated, thick, and deeply flavorful. The mushrooms should appear relatively dry and begin lightly browning on both the bottom of the pan and throughout the mixture. This process can take anywhere from 10 to 20 minutes depending on the moisture content of the mushrooms.
- Once cooked, spread the duxelles onto a large plate in an even layer and refrigerate until completely chilled, approximately 30 minutes to 1 hour. Cooling the mixture helps prevent the pastry from becoming soggy later.
- Lay a 2-foot-long sheet of plastic wrap across your work surface. Place a second sheet above it, overlapping slightly to create a larger surface. Arrange the prosciutto slices in a slightly overlapping rectangle large enough to completely encase the roast. Begin with several slices along the bottom edge, then continue layering additional slices above until the rectangle is slightly larger than the beef tenderloin. Trim and overlap pieces as necessary to create a continuous layer.
- Remove the kitchen twine from the chilled roast. Spread the cooled mushroom duxelles evenly over the prosciutto, leaving about a ½-inch border along the top edge. The mushroom layer should be even and completely cover the prosciutto surface.
- Place the tenderloin horizontally along the bottom edge of the mushroom-covered prosciutto. Using the plastic wrap as a guide, carefully roll the prosciutto and mushroom mixture tightly around the beef. Continue rolling until the roast is completely enclosed in a uniform layer. Trim away any excess prosciutto hanging off the ends if necessary.
- Reposition the wrapped roast on the plastic wrap seam-side down and roll it tightly once more inside the plastic wrap. Twist the ends firmly and roll the package along the countertop several times to tighten the shape and create a compact cylinder. Secure the ends with knots or kitchen twine. Refrigerate for at least 30 minutes, or up to 8 hours, to help everything hold its shape.
- Prepare the Puff Pastry
- Position a rack in the center of the oven and preheat to 425°F (220°C). Line a rimmed baking sheet with parchment paper. Beat the egg in a small bowl to create an egg wash.
- Lightly flour a work surface and unfold the puff pastry. If using two sheets, overlap them slightly and pinch the seam together to create one large sheet. Roll the pastry from side to side rather than lengthwise, creating a rectangle that is approximately 6–8 inches wider than the roast. This ensures there is enough pastry to completely encase the Wellington.
- Remove the roast from the refrigerator and discard the plastic wrap. Place the roast seam-side down along the bottom edge of the pastry, centering it carefully. Roll the pastry tightly around the roast. Just before the final edge overlaps, brush that section with egg wash to help create a secure seal.
- Trim away any excess pastry and reserve it for decorative purposes if desired. Press the seam firmly to seal the pastry around the roast. Fold the pastry over both ends of the roast, brushing each fold with egg wash to secure it in place. Trim any excess dough and ensure the entire Wellington is neatly enclosed.
- Transfer the wrapped Wellington to the prepared baking sheet with the seam facing downward. Brush the entire surface generously with egg wash to promote a beautifully golden finish during baking.
- Place the baking sheet into the preheated oven and bake for 40–50 minutes. The pastry should become deeply golden brown and crisp while the center of the beef reaches approximately 105°F (41°C) for medium-rare before resting. If the pastry begins browning too quickly, loosely tent the top with aluminum foil while the beef continues cooking.
- Once baked, remove the Wellington from the oven and allow it to rest on the baking sheet for 20 minutes. During this time, the internal temperature will continue to rise, and the juices will redistribute throughout the meat, resulting in more tender slices.
- Using a large spatula, carefully transfer the rested Wellington to a cutting board. With a sharp serrated knife, slice the roast crosswise into approximately 1-inch-thick portions. Use gentle sawing motions to preserve the flaky pastry and keep the layers intact.
- If desired, sprinkle the exposed beef with a small amount of flaky finishing salt just before serving. Transfer the slices carefully to individual plates or a serving platter. The finished Beef Wellington should reveal beautiful layers of golden puff pastry, savory mushroom duxelles, delicate prosciutto, and perfectly cooked tenderloin at the center. Serve immediately while the pastry remains crisp and the beef is warm and juicy.
Frequently Asked Questions
I know you probably have a million questions about pulling off a Beef Wellington recipe, especially about choosing the right beef and keeping that pastry golden. Here’s what I get asked most often (and what I wish I’d known early on).
What cut of beef makes the most tender, juicy Wellington?
I always reach for beef tenderloin. It’s the most tender cut out there and cooks up juicy every time in a Beef Wellington recipe.
Tenderloin is the traditional choice because you get reliable results—still fork-tender even after wrapping and baking at high heat.
How do you keep the pastry crisp and avoid a soggy bottom?
The secret to a crisp pastry in your Beef Wellington recipe? Cook the mushroom duxelles until it’s totally dry. The most common mistake is not cooking the duxelles enough, which makes the pastry soggy.
I cook mushrooms over medium-high heat for 15–20 minutes until there’s no liquid left. I also sear the beef on all sides to lock in juices, then let it cool before wrapping it up.
What internal temperature should the beef reach for medium-rare Wellington?
I shoot for 125–130°F for medium-rare. A meat thermometer is your best friend here.
I stick the thermometer in the thickest part of the beef. It’ll keep cooking as it rests, so don’t panic if it looks a touch under when you first pull it out.
Can you make individual Wellingtons ahead of time without ruining the crust?
I love prepping individual Beef Wellington ahead—they’re easy to portion and bake evenly. I assemble them (but skip the egg wash) and chill overnight. The next day, I brush on the egg wash just before baking.
You can freeze assembled Beef Wellington for up to two months if you wrap them tightly. Thaw in the fridge before baking for best results.
What can you use instead of pâté or duxelles if you want a simpler filling?
If the classic duxelles feels like too much work, you can skip the pâté and just use a hearty mushroom layer in your Beef Wellington recipe.
I sometimes do a quick version: sauté finely chopped mushrooms with garlic and thyme until dry. Or, I’ll use a thin layer of cream cheese mixed with herbs—super easy and still delicious.
There’s no rule that says you can’t experiment. The best Beef Wellington recipe is the one you actually make and enjoy.
How long should mini Wellingtons bake when using puff pastry?
I usually pop my mini Wellingtons in the oven for 20 to 25 minutes at 400 degrees Fahrenheit. With their smaller size, they cook a lot faster than a classic Beef Wellington recipe, which is honestly a relief if you’re short on time or patience.
After about 18 minutes, I grab my thermometer and check the internal temp. You want the pastry to look deeply golden brown, and the beef inside should hit 125 degrees if you’re aiming for medium-rare—classic Beef Wellington recipe vibes. Sometimes, I peek in early just to make sure I’m not about to overdo it. There’s nothing worse than dry beef in a Beef Wellington recipe, right?
If you’re starting with frozen puff pastry (which, let’s be real, most of us do), let it thaw in the fridge overnight. Rushing this step can mess with the texture, and you really want that gorgeous, flaky crust you see in every drool-worthy Beef Wellington recipe photo. Trust me, it makes a difference. And hey, if you’re experimenting with your own Beef Wellington recipe twists, don’t forget to keep an eye on how the pastry bakes up—sometimes it surprises you.

Recipes are gathered in person and written for real-world cooking conditions.
- 10 Hungarian Dessert Recipes Passed Down Through Generations - July 25, 2026
- 11 Easy English Recipes Anyone Can Make - July 25, 2026
- Hungarian Kifli Recipe - July 25, 2026